Content
Motivation
Before I actually use Docker, the only thing I know about Docker is that it is a tool to create a box that make sure an application can be run over everyone’s machine. I don’t even know why we need that box and what’s really going on in the box.
After I worked as a Data Engineer, I started to know the importance of dependencies in a project or application. If we would like to make everyone contribute a project smoothly, it would be better to force everyone under the same environment or dependencies. I will talk about the dependency maintenance in another blog.
Let’s switch back to Docker. The motivation of Docker is to provide a project or an application with the same environment and dependency. Every one has their own machines with different operating systems(MacOS, Windows, Linux), different version of the system even different setting. Each little different components may cause failure of an application. To resolve this issue, Docker comes to live. Docker offers an simple way to build and run an application without thinking about much lower level setting or system diversity issue.
Basic Concept
Here are some basic concepts frequently used as a client.
Docker Images:
When I was a a child, the old Windows time, I always heard someone said they had the image to help others reinstall the system. That image refers a disk image, a replica of the contents fo a storage device stored on a second storage device. That image can reset and install a brand new system. We can think about docker image in a similar way. A docker image can set and install a ‘system’(environment) for an application every time you run the application.
Docker image is a read-only template with instructions for creating a Docker Container, which means
you can record the way how you set up the environment for the application for the container
setting in a template file called Dockerfile using Docker syntax.
Often, an image is based on another image an some additional customization. For example, we can include a python image, commands to prepare some required dependencies and commands to start a flask app. With this docker image, every one can run a flask app without considering environment issue.
One interesting property of docker image is that each instruction will creates a layer and get cached from top to the bottom. When we rebuild the image, the process is fast since each layer gets cached. But when we change some instructions and rebuild the image, the process will recreate the layers from the first instruction we change to the bottom instruction. Sometimes a large image can be build for more than 5 minutes, with this property, we know the best practice is to put the instruction with lower chances changing on the top.
Docker Container
Docker Container is a runnable instance of image. We can create, start, stop, move or delete using Docker CLI. We can connect one or more networks and attach storage to it.
Architecture
Docker uses a client-server architecture as follow,
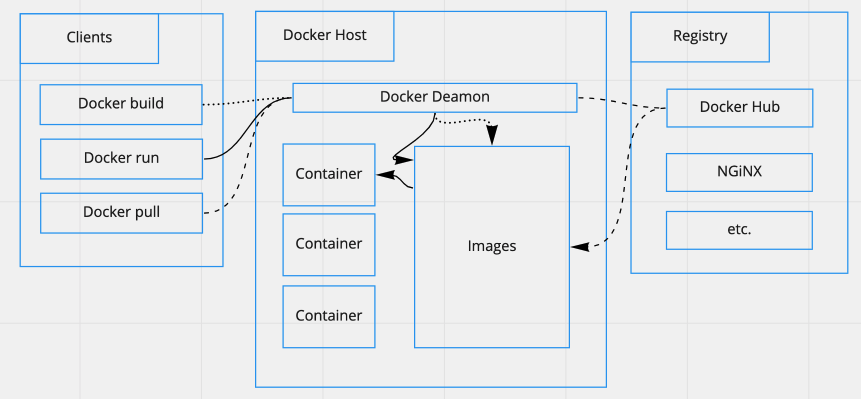
Here are some other concepts in this architecture graph.
Docker Deamon:
Docker Deamon is used to listen client API requests, manage docker object like container, images, network, volume and communicate with other deamons to manage docker service.
Docker Registry(Docker Hub)
Docker Hub is the most typical docker registry. We can image Docker Hub is a public library holding enormous amount of images in remote side. Every one can push their own images into Docker Hub and pull others’ images from Docker Hub for their own use.
Explanation:
In the graph, there are three types of lines representing how Docker deamon reacts with those three client commends.
- When we run
docker build, the images will be created in Docker deamon - When we run
docker pull, the required images can be pulled from the configured registry. - When we run
docker run, the images will be created and then send the image into container to spawn up the application
Apart from the above commands, when we run docker push, we can push our image to the
configured registry.
Example
Let’s go through an official docker example to understand how we can use docker to deploy our own application. I will explain what underlying process happening with each step.
Prepare project
First we create our project in the following folder structure
flask_sample/
    templates/
        index.html
    .tool-versions
    app.py
    Dockerfile
    poetry.lock
    pyproject.toml
The tool-versions comes from asdf, a runtime version management package.
Also, pyproject.toml and poetry.lock comes from poetry, This way is better than using requirements.txt in a project.
I will cover details in another blog about dependency management.
In the index.html, we can use the following code, it just define the layout of the web page
<html>
  <head>
    <style type="text/css">
      body {
        background: black;
        color: white;
      }
      div.container {
        max-width: 500px;
        margin: 100px auto;
        border: 20px solid white;
        padding: 10px;
        text-align: center;
      }
      h4 {
        text-transform: uppercase;
      }
    </style>
  </head>
  <body>
    <div class="container">
      <h4>Cat Gif of the day</h4>
      <img src="{{url}}" />
      <p><small>Courtesy: <a href="https://www.buzzfeed.com/copyranter/the-best-cat-gif-post-in-the-history-of-cat-gifs">Buzzfeed</a></small></p>
    </div>
  </body>
</html>
Then we add app.py file into the project folder, it’s the script define the application functionality and connect the application
with IP 0.0.0.0.
from flask import Flask, render_template
import random

app = Flask(__name__)

# list of cat images
images = [
   "https://img.buzzfeed.com/buzzfeed-static/static/2013-10/enhanced/webdr05/15/9/anigif_enhanced-buzz-26388-1381844103-11.gif",
    "https://img.buzzfeed.com/buzzfeed-static/static/2013-10/enhanced/webdr01/15/9/anigif_enhanced-buzz-31540-1381844535-8.gif",
    "https://img.buzzfeed.com/buzzfeed-static/static/2013-10/enhanced/webdr05/15/9/anigif_enhanced-buzz-26390-1381844163-18.gif",
    "https://img.buzzfeed.com/buzzfeed-static/static/2013-10/enhanced/webdr06/15/10/anigif_enhanced-buzz-1376-1381846217-0.gif",
    "https://img.buzzfeed.com/buzzfeed-static/static/2013-10/enhanced/webdr03/15/9/anigif_enhanced-buzz-3391-1381844336-26.gif",
    "https://img.buzzfeed.com/buzzfeed-static/static/2013-10/enhanced/webdr06/15/10/anigif_enhanced-buzz-29111-1381845968-0.gif",
    "https://img.buzzfeed.com/buzzfeed-static/static/2013-10/enhanced/webdr03/15/9/anigif_enhanced-buzz-3409-1381844582-13.gif",
    "https://img.buzzfeed.com/buzzfeed-static/static/2013-10/enhanced/webdr02/15/9/anigif_enhanced-buzz-19667-1381844937-10.gif",
    "https://img.buzzfeed.com/buzzfeed-static/static/2013-10/enhanced/webdr05/15/9/anigif_enhanced-buzz-26358-1381845043-13.gif",
    "https://img.buzzfeed.com/buzzfeed-static/static/2013-10/enhanced/webdr06/15/9/anigif_enhanced-buzz-18774-1381844645-6.gif",
    "https://img.buzzfeed.com/buzzfeed-static/static/2013-10/enhanced/webdr06/15/9/anigif_enhanced-buzz-25158-1381844793-0.gif",
    "https://img.buzzfeed.com/buzzfeed-static/static/2013-10/enhanced/webdr03/15/10/anigif_enhanced-buzz-11980-1381846269-1.gif"
    ]

@app.route('/')
def index():
    url = random.choice(images)
    return render_template('index.html', url=url)

if __name__ == "__main__":
    app.run(host="0.0.0.0")
Write Dockerfile
Now, let’s create our Dockerfile. All we need to add in Dockerfile is sequentially
write down the commands to build up the environment and dependency.
FROM python:3.7.4-slim
Our base image is python 3.7.4. On Docker Hub, there is lots of python images available.
We pick up python:3.7.4-slim image.
WORKDIR /usr/src/app
Declare the work directory in the container. In container we will have the directory /usr/src/app.
ENV FLASK_APP=app.py
We export the flask environment into the container.
RUN pip install --upgrade pip
RUN pip install poetry==0.12.17
Since the python image only contains pip. So to run poetry command, we need to use
pip install poetry in the container.
ADD pyproject.toml .
ADD poetry.lock .
We copy our dependency management file into the container.
RUN poetry install --no-dev
Since we have already have the pyproject.toml and poetry.lock files in the container.
Now we can install the dependencies in the container. Flag --no-dev means we only install
dependencies unrelated to develop use. After this command, the container now holds all
dependencies we need.
COPY app.py /usr/src/app/
COPY templates/index.html /usr/src/app/templates/
We prepare all required files in the container work directory to run the application.
EXPOSE 5000
We tell the container expose on port number 5000.
CMD ["poetry", "run", "flask", "run", "--host=0.0.0.0"]
In the container, we run the flask app. This is the special syntax to run command inside container. The command is separated by comma for each keyword.
We all set now.
The whole script of Dockerfile:
FROM python:3.7.4-slim

WORKDIR /usr/src/app

ENV FLASK_APP=app.py

RUN pip install --upgrade pip
RUN pip install poetry==0.12.17

ADD pyproject.toml .
ADD poetry.lock .

RUN poetry install --no-dev

COPY app.py /usr/src/app/
COPY templates/index.html /usr/src/app/templates/

EXPOSE 5000

CMD ["poetry", "run", "flask", "run", "--host=0.0.0.0"]
Build Docker Image
docker build -t <user_name>/myfirstapp .
Flag -t means tag my image with a name. Now the Docker deamon holds the image you build.
We can check image using docker image ls to see what image is available in our Docker deamon.
Run Image
docker run -p 5000:5000 --name myfirstapp <user_name>/firstapp
Flag -p means port. With this flag, we can plugin the local port with the docker application
port. --name is actually the application name. The finally argument is the image name.
We can check the status of docker application container by running docker ps. docker ps -a
will show all applications run by docker including closed applications
Awesome, now we learn how to run a docker application now. So how to make other people run my
application in other machine? Making sure everyone can run an application conveniently is the
point of Docker. One way is that we can push our image into Docker Hubso that others can
fetch our image from Docker Hub by running docker push <user_name>/myfirstapp.
Some other useful commands:
docker stop myfirstapp
to stop the application container.
docker rm myfirstapp
to delete the application container.
Summary
The above content is basically what I have tried and learned at the first time. Hopefully this can help understanding at the very beginning of the journey of Docker. This blog is only the tip of iceberg of Docker. Some of the content is referenced from official documentation. I highly recommend reading the official documentation for more advanced details.