Recently, I started grinding on Kubernetes since Kubernetes is the deployment tool Simplebet uses for deploying the whole ecosystem of the sports betting products. Apart from this, I believe Kubernetes becomes the mainstream of deployment of services. Thus it is worthy having a grasp of this technology. In the following blogs of this series, I will cover what I have learned on Kubernetes.
What is Kubernetes
As the official definition, Kubernetes is a portable, extensible, open-source platform for managing containerized workloads and services. This might be abstract. But as a beginner of Kubernetes, my understanding of Kubernetes is based on Docker knowledge. Thinking about containerizing a web app with docker compose, we may have storage layer, cache layer, core functionality layer or even some middleware and so on. When we config a docker compose yaml file, we can spawn up multiple containers to make sure the application is up with full functionality as we want. This is a scenario where we would like to bring one application into a health status. What if we would like to bring several applications up? How can we make sure other users can access to those applications? If there are multiple applications sharing same resources like a database server, how are those resources allocated? Furthermore, as a developer, we all know we make numerous changes to our applications or services every day. How can we make sure we apply changes and migrations to the service without down time?
With those questions, Kubernetes comes into our eyes. It is a tool used for deployment taking communication, resource allocation, access, migration and so on among various services or applications into account.
Cluster Architecture

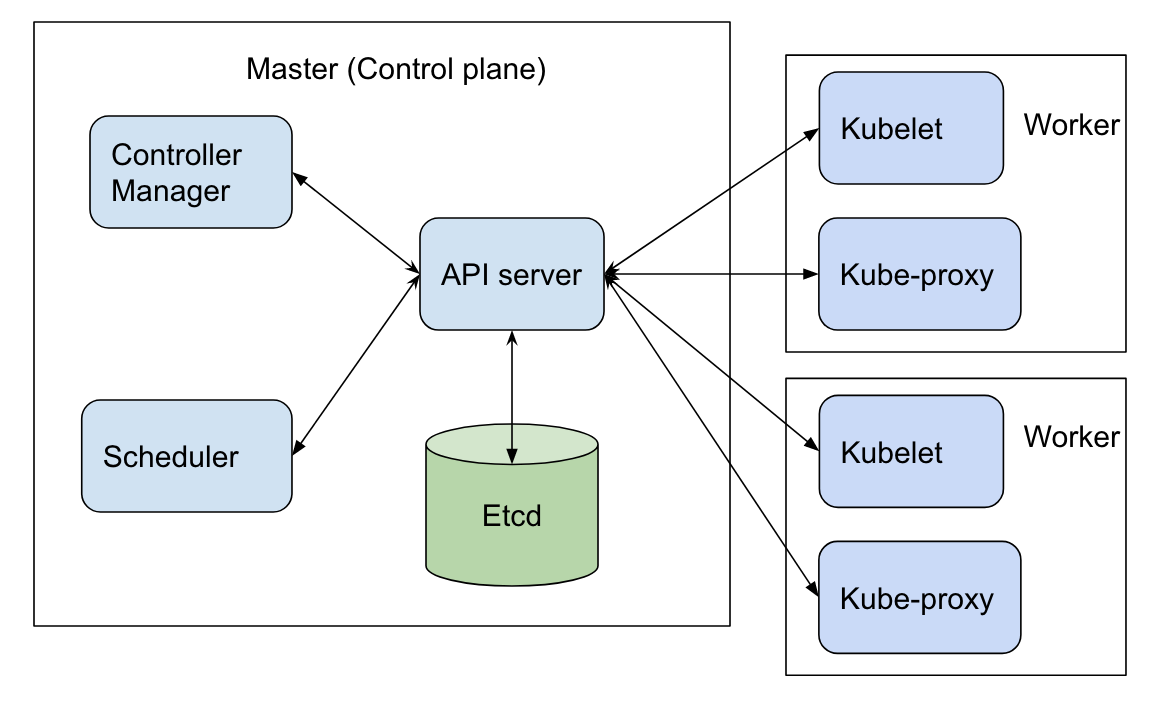
Here is an architecture image from google. It shows some core components of Kubernetes architecture. I will go through one by one.
Master
Etcd
Etcd refers a distributed reliable key-value store that is simple, secure and fast, like redis. Etcd is
mainly used to store the metadata of the cluster. For example, when we run kubectl get pods, the
information of the pods will show up in the result. This information is from Etcd. Similarly, most of
platforms have their backend stores. When we spawn an airflow service, a aiflow.db will be
generated used for recording the dag metadata. This is the reason why we can see the dag, tree information
in the airflow scheduler UI.
Controller Manager
The Controller Manager takes mainly two responsibilities, watch status and remediate situations. The Controller Manager is like a brain of the master of Kubernetes cluster. For example, the node controller monitors the status of node and keep the application running. It will check the heartbeats of node every 5s through API server. If the node controller cannot hear back from one node, it will mark the node as unreachable. Before the mark, it also provide 40s grace period. It the node cannot come back even after the grace period. It will restart a node in 5min. Another example in the Controller Manager set is the replication controller. Similarly, it uses the API server to check the heath of replicas. If a replica is down, the replication controller will spawn a new replica to maintain the replicaset remain the same size as before.
Scheduler
Scheduler is deciding which pods go to which node. It has two criteria to make the decision. The first one is the resource filter. Obviously, a 6GB container cannot be loaded into a 4GB memory node. Apart from memory, other things like the number of CPU cores can also be treated as resources in the resource filter. The other criteria is rank, which means for some reason, a node can be used as a prioritized node for some pods. If the remaining resources of the node can be used by another pod after taking a pod into the node, the node will get a higher rank than other nodes. The benefit of this is to increase the resource efficiency of the cluster.
API server
The API server can authenticate the request and manipulate the metadata from Etcd . For example,
we can describe a pod information with kubectl describe pod mypod. With this command, we actually hit
the API server with a get request and let it to fetch us metadata of mypod. If we run
kubectl create -f mypod-definition.yaml, part of this command will pass a post request to the API
server and insert the metadata of mypod, indicating mypod is created and metadata of it has already been
in Etcd. As we talked in previous section, Controller Manager, Scheduler, Kubelet components actually
make the monitor, update and creation happen.
Worker
Kubelet
Kubelet is a component for each worker. There are several responsibilities for Kubelet. The first one is registering a node. The second one is that it is the one actually creating the pods in a node, including pull image from dockerhub for example and prepare all environment in a pod. Finally, the Kubelet also monitor the node and pods inside of it and report the status to API server in the Master.
Kube-Proxy
The Kube-Proxy is the component in each worker to connect other services across different nodes. We can expose a service from Node A to Kube-proxy in Node B so that the Node B can access that service easily in case the IP address of the Node A changes dynamically.
In my next blog of the series, I will cover some concepts like pod, service, deployments and so on as well as the way to write a config yaml.